# Uploading Files and Creating Avatars for Contacts With AdonisJS and Axios
**Author:** Ndianabasi Udonkang
**Published:** 2021-11-10
In this lesson, we will learn how to upload images and create avatars with AdonisJS and Quasar Frameworks and the Axios HTTP library.
---
## Tags
- [JavaScript](/llms/technical-blog/tag/javascript.md)
- [Nodejs](/llms/technical-blog/tag/nodejs.md)
- [Vuejs](/llms/technical-blog/tag/vuejs.md)
- [Adonisjs](/llms/technical-blog/tag/adonisjs.md)
- [Quasar Framework](/llms/technical-blog/tag/quasar-framework.md)
## Part of Series: [Full-Stack Google Contacts Clone with Node.js (Adonisjs Framework) and Vue.js (Quasar Framework)](/llms/technical-blog/series/clnwu9bc991hiu3wo2vwmw45/full-stack-google-contacts-clone-with-node-js-adonisjs-framework-and-vue-js-quasar-framework.md)
This article is part of the **[Full-Stack Google Contacts Clone with Node.js (Adonisjs Framework) and Vue.js (Quasar Framework)](/llms/technical-blog/series/clnwu9bc991hiu3wo2vwmw45/full-stack-google-contacts-clone-with-node-js-adonisjs-framework-and-vue-js-quasar-framework.md)** series.
### Articles in this Series:
- [Introduction to Full-Stack Google Contacts Clone with Node.js (Adonisjs Framework) and Vuejs (Quasar Framework)](/llms/technical-blog/article/xe5mlxg43s9rpx1pxsvfdp3r/introduction-to-full-stack-google-contacts-clone-with-node-js-adonisjs-framework-and-vuejs-quasar-framework.md)
- [Workspace Setup | Full-Stack Google Contacts Clone with Adonis.js/Node.js and Quasar (Vue.js)](/llms/technical-blog/article/fo8str8yjpkz5dygxg875bpw/workspace-setup-full-stack-google-contacts-clone-with-adonis-js-node-js-and-quasar-vue-js.md)
- [Frontend Overview | Full-Stack Google Contacts Clone with Adonis.js/Node.js and Quasar (Vue.js)](/llms/technical-blog/article/nxgmng6fhf1cwjk30coflro2/frontend-overview-full-stack-google-contacts-clone-with-adonis-js-node-js-and-quasar-vue-js.md)
- [The Left Drawer | Full-Stack Google Contacts Clone with Adonis.js/Node.js and Quasar (Vue.js)](/llms/technical-blog/article/m6fagvy2il5h65llxxbbl9os/the-left-drawer-full-stack-google-contacts-clone-with-adonis-js-node-js-and-quasar-vue-js.md)
- [Improve The Header | Full-Stack Google Contacts Clone with Adonis.js/Node.js and Quasar (Vue.js)](/llms/technical-blog/article/jjwbxcg450jmkkcrrmkmwvwj/improve-the-header-full-stack-google-contacts-clone-with-adonis-js-node-js-and-quasar-vue-js.md)
- [New Contact Form Design | Full-Stack Google Contacts Clone with Adonis.js/Node.js and Quasar (Vue.js)](/llms/technical-blog/article/ebguwpkntk3empakunrki4dq/new-contact-form-design-full-stack-google-contacts-clone-with-adonis-js-node-js-and-quasar-vue-js.md)
- [Validating the Contact Form with Vuelidate | Full-Stack Google Contacts Clone with Adonis.js/Node.js and Quasar (Vue.js)](/llms/technical-blog/article/z0xr9m2ljler2cwnpsw2ycwa/validating-the-contact-form-with-vuelidate-full-stack-google-contacts-clone-with-adonis-js-node-js-and-quasar-vue-js.md)
- [Designing the Contacts Table | Full-Stack Google Contacts Clone with Adonis.js/Node.js and Quasar (Vue.js)](/llms/technical-blog/article/h2p1x1z406ib38zu2dci3jur/designing-the-contacts-table-full-stack-google-contacts-clone-with-adonis-js-node-js-and-quasar-vue-js.md)
- [Designing the Contacts Table (Part 2) | Full-Stack Google Contacts Clone with Adonis.js/Node.js and Quasar (Vue.js)](/llms/technical-blog/article/j0iscua9gg8ekuz8ifh6chpn/designing-the-contacts-table-part-2-full-stack-google-contacts-clone-with-adonis-js-node-js-and-quasar-vue-js.md)
- [Refactoring the Main Layout | Full-Stack Google Contacts Clone with Adonis.js/Node.js and Quasar (Vue.js)](/llms/technical-blog/article/uktmlqsivwtr3cvnpld59k9q/refactoring-the-main-layout-full-stack-google-contacts-clone-with-adonis-js-node-js-and-quasar-vue-js.md)
- [Improving User Experience with the Contacts Table | Full-Stack Google Contacts Clone with Adonis.js/Node.js and Quasar (Vue.js)](/llms/technical-blog/article/dzs812auf61ej7qu2cg726dh/improving-user-experience-with-the-contacts-table-full-stack-google-contacts-clone-with-adonis-js-node-js-and-quasar-vue-js.md)
- [Designing the Contact Details Page | Full-Stack Google Contacts Clone with Adonis.js/Node.js and Quasar (Vue.js)](/llms/technical-blog/article/kf9pz97n63fvgfrcy5viwzrg/designing-the-contact-details-page-full-stack-google-contacts-clone-with-adonis-js-node-js-and-quasar-vue-js.md)
- [Creating the Contact Edit Page | Full-Stack Google Contacts Clone with Adonis.js/Node.js and Quasar (Vue.js)](/llms/technical-blog/article/fmr90prj84c9zn0633jc368g/creating-the-contact-edit-page-full-stack-google-contacts-clone-with-adonis-js-node-js-and-quasar-vue-js.md)
- [How Software Backends Work | Full-Stack Google Contacts Clone with AdonisJs (Node.js) and Quasar Framework (Vue.js)](/llms/technical-blog/article/aca8fcrghz70nn1wqg3uzbum/how-software-backends-work-full-stack-google-contacts-clone-with-adonis-js-node-js-and-quasar-framework-vue-js.md)
- [Setting Up The Backend | Full-Stack Google Contacts Clone with AdonisJs (Node.js) and Quasar Framework (Vue.js)](/llms/technical-blog/article/fxb49fmz9ljbwrimbnnzudfv/setting-up-the-backend-full-stack-google-contacts-clone-with-adonis-js-node-js-and-quasar-framework-vue-js.md)
- [Why Choose the AdonisJs Framework? | Full-Stack Google Contacts Clone with AdonisJs (Node.js) and Quasar Framework (Vue.js)](/llms/technical-blog/article/lnhm5oudx34yo2869gmcms37/why-choose-the-adonis-js-framework-full-stack-google-contacts-clone-with-adonis-js-node-js-and-quasar-framework-vue-js.md)
- [Setting Up Our API Server with AdonisJs Framework | Full-Stack Google Contacts Clone with AdonisJs (Node.js) and Quasar Framework (Vue.js)](/llms/technical-blog/article/x1jgmet84aqj9qggu5mulkh0/setting-up-our-api-server-with-adonis-js-framework-full-stack-google-contacts-clone-with-adonis-js-node-js-and-quasar-framework-vue-js.md)
- [Setting Up Postman with the API Server | Full-Stack Google Contacts Clone with AdonisJS (Node.js) and Quasar Framework (Vue.js)](/llms/technical-blog/article/v4qehksislosmuy92qgjr4ct/setting-up-postman-with-the-api-server-full-stack-google-contacts-clone-with-adonis-js-node-js-and-quasar-framework-vue-js.md)
- [The Model-View-Controller Design Pattern in AdonisJS | Full-Stack Google Contacts Clone with AdonisJS (Node.js) and Quasar Framework (Vue.js)](/llms/technical-blog/article/h5wqql65iejop5xrplujw458/the-model-view-controller-design-pattern-in-adonis-js-full-stack-google-contacts-clone-with-adonis-js-node-js-and-quasar-framework-vue-js.md)
- [Create Column Definitions & Insert New Contacts | Full-Stack Google Contacts Clone with AdonisJS (Node.js) and Quasar Framework (Vue.js)](/llms/technical-blog/article/asc2emsho4u73r6jb2gxjddw/create-column-definitions-and-insert-new-contacts-full-stack-google-contacts-clone-with-adonis-js-node-js-and-quasar-framework-vue-js.md)
- [Data Validation & Sanitisation with AdonisJS | Full-Stack Google Contacts Clone with AdonisJS (Node.js) and Quasar Framework (Vue.js)](/llms/technical-blog/article/bcey0ac7m5sbs9hqy1h824sl/data-validation-and-sanitisation-with-adonis-js-full-stack-google-contacts-clone-with-adonis-js-node-js-and-quasar-framework-vue-js.md)
- [Creating a Middleware and Updating a Contact | Full-Stack Google Contacts Clone with AdonisJS (Node.js) and Quasar Framework (Vue.js)](/llms/technical-blog/article/oqxzmtgfy1r3oewpnedc7wf6/creating-a-middleware-and-updating-a-contact-full-stack-google-contacts-clone-with-adonis-js-node-js-and-quasar-framework-vue-js.md)
- [Fetching and Deleting a Contact with AdonisJS | Full-Stack Google Contacts Clone with AdonisJS Framework (Node.js) and Quasar Framework (Vue.js)](/llms/technical-blog/article/p6bh0ponq43u3vi6o8uww84x/fetching-and-deleting-a-contact-with-adonis-js-full-stack-google-contacts-clone-with-adonis-js-framework-node-js-and-quasar-framework-vue-js.md)
- [Using Model Factories and Seeders in AdonisJS | Full-Stack Google Contacts Clone with AdonisJS Framework (Node.js) and Quasar Framework (Vue.js)](/llms/technical-blog/article/cfotveuxbgjtdp12l6pzcb2y/using-model-factories-and-seeders-in-adonis-js-full-stack-google-contacts-clone-with-adonis-js-framework-node-js-and-quasar-framework-vue-js.md)
- [Creating and Registering a Vuex Module | Full-Stack Google Contacts Clone with AdonisJS Framework (Node.js) and Quasar Framework (Vue.js)](/llms/technical-blog/article/cw96ewnzujgsz2e2garhbuzb/creating-and-registering-a-vuex-module-full-stack-google-contacts-clone-with-adonis-js-framework-node-js-and-quasar-framework-vue-js.md)
- [Connecting UI Components to the Vuex Store | Full-Stack Google Contacts Clone with AdonisJS Framework (Node.js) and Quasar Framework (Vue.js)](/llms/technical-blog/article/fdyqp17yehbnqrjvjvab4b5b/connecting-ui-components-to-the-vuex-store-full-stack-google-contacts-clone-with-adonis-js-framework-node-js-and-quasar-framework-vue-js.md)
- [Connecting the Frontend to the API Server | Full-Stack Google Contacts Clone with AdonisJS Framework (Node.js) and Quasar Framework (Vue.js)](/llms/technical-blog/article/fk4262359gg3g7f0jn95fn9b/connecting-the-frontend-to-the-api-server-full-stack-google-contacts-clone-with-adonis-js-framework-node-js-and-quasar-framework-vue-js.md)
- [Creating and Updating Contacts From the Frontend | Full-Stack Google Contacts Clone with AdonisJS Framework (Node.js) and Quasar Framework (Vue.js)](/llms/technical-blog/article/t15w2s3ao9jo74l96stjo7z6/creating-and-updating-contacts-from-the-frontend-full-stack-google-contacts-clone-with-adonis-js-framework-node-js-and-quasar-framework-vue-js.md)
- **Uploading Files and Creating Avatars for Contacts With AdonisJS and Axios** (Current Article)
- [Deleting a Contact with AdonisJS and Vuejs](/llms/technical-blog/article/zdr4pxmgcax2dsfnwimhty0g/deleting-a-contact-with-adonis-js-and-vuejs.md)
---
## Article Content
In this lesson, we will learn how to upload images for the purpose of creating avatars for contacts in our Google Contacts Clone App. We will make use of the `QFile` component from the Quasar Framework, the `Axios` HTTP library, and AdonisJS' `Attachment Lite` addon to upload images from the frontend and save them to the API server's local storage while also persisting metadata about the images to the database.
Let's create a new branch of our project:
```bash
# Make sure you are within your project
git checkout -b 20-add-avatars-to-contacts
```
## Overview of the File Upload Process
Uploading a file is a very simple operation. Some frameworks make it look complicated but the AdonisJS Framework makes it very simple. You just need to understand the differences in the payload and HTTP request settings when a file is involved. The AdonisJS Framework goes further to make the file upload process even simpler and fun by provided file handling out-of-the-box. You do not need to install third-party addon and stitch them together with glue code. AdonisJS comes preinstalled with the `BodyParser` module which handles file uploads exceptionally. The `validator` module which we've used already in the series is also preinstalled and handles validation for free without installing third-party validation libraries. The AdonisJS `attachment-lite` addon (which we have to install) will handle the entire lifecycle of an uploaded file automatically when used.
> With AdonisJS, you can still upload file very easily without the `atttachment-lite` addon. But we will use it to make things extremely simple and fun.
Earlier in the `CreateContact.vue` component, we composed the [submitPayload](https://github.com/ndianabasi/google-contacts/blob/944e84194a1ef98ca5767783b0198889edc31c4a/ui/src/pages/contacts/CreateContact.vue#L298-L316) and dispatched the payload via the `contacts/CREATE_CONTACT` action when we want to create or edit a contact. The `axios` HTTP library will transform the JavaScript object into JSON before making the API request. The JSON payload is just a bunch of keys with string/number/array/object/null values. It is impossible to add a `File` object to a JSON payload. Hence, our normal workflow won't work when we want to upload a file.
So how do we package a file or files for upload?
1. We must use a `FormData` object created with the [FormData class](https://developer.mozilla.org/en-US/docs/Web/API/FormData). The FormData class creates a multipart object with keys and values which might look like a JSON object on the surface. However, a FormData object allows us to add a `File` object as a value to any key unlike JSON object. The `FormData` will be dispatched as the payload of the `POST` or `PUT` request in our app.
2. Set the `header` - `Content-Type": "multipart/form-data` - in the config object of the `axios` request.
Once we do the above, AdonisJS will automatically parse the files contained in the `FormData` object, validate them, and make them available in the Controller for consumption.
This lesson will take you through this process in very practical details.
## Upgrades and Installations
If you are following along at the time this article was published, you might need to upgrade the dependencies for the API server. If you are following quite later, this upgrade step won't be necessary.
Stop the API server by pressing CTRL+C in the terminal instance where the API server is running. Then, run the following:
```bash
# Make sure you are in the `api` directory
yarn add @adonisjs/core@latest @adonisjs/ally@latest @adonisjs/view@latest @adonisjs/repl@latest @adonisjs/lucid@latest @adonisjs/auth@latest
```
Next, we will install the `@adonisjs/attachment-lite` addon which provides seamless image management for our API server. The `@adonisjs/attachment-lite` addon can save images for a particular model property, persist JSON metadata of the images corresponding columns in the database, handle updates of the images, automatically delete old images when a new one is uploaded or if the entire model is deleted. Read more about the [addon here](https://github.com/adonisjs/attachment-lite).
Install and configure the `@adonisjs/attachment-lite` addon.
```bash
# Make sure you are in the `api` directory
yarn add @adonisjs/attachment-lite
# Configure the addon
node ace configure @adonisjs/attachment-lite
```
You can now run the API server again.
## Adding the `profile_picture` Column to the `contacts` Table
Here, we will create a new migration file, add the `profile_picture` column in the migration file, and run the migration. Run the command below to create the migration file.
```bash
# Make sure you are in the `api` directory
node ace make:migration add_profile_picture_column_to_contacts --table=contacts
```
The above command will create a file: `api/database/migrations/xxxxxxxxxxxx_add_profile_picture_column_to_contacts .ts`. Open the file. Refer to [this snapshot](https://github.com/ndianabasi/google-contacts/blob/21-add-profile-picture-for-contacts/api/database/migrations/1636391282145_add_profile_picture_columns.ts) of the file. Copy-and-paste the content of the snapshot into the `api/database/migrations/xxxxxxxxxxxx_add_profile_picture_column_to_contacts .ts` file.
```ts
import BaseSchema from '@ioc:Adonis/Lucid/Schema'
export default class Contacts extends BaseSchema {
protected tableName = 'contacts'
public async up() {
this.schema.alterTable(this.tableName, (table) => {
table.json('profile_picture').after('notes')
})
}
public async down() {
this.schema.alterTable(this.tableName, (table) => {
table.dropColumn('profile_picture')
})
}
}
```
Basically, we are creating a new column with a JSON data type with the function call ` table.json('profile_picture').after('notes')`. The column will be inserted after the `notes` column so that the `timestamp` columns are still at the end. If we rollback the migration, the column will be dropped as per the call - `table.dropColumn('profile_picture')` - in the `down` method.
> We chose to use a JSON data type because the metadata of the images will be persisted to the database in JSON format as shown below:
```json
{
"url": "/uploads/avatars/ckvr0jw3j0001iwvo3c6x0kob.jpg",
"name": "avatars/ckvr0jw3j0001iwvo3c6x0kob.jpg",
"extname": "jpg",
"size": 217546,
"mimeType": "image/jpeg"
}
```
## Adding `profilePicture` Property to the `Contact` Model
Open the `api/app/Models/Contact.ts` file. Refer to [this snapshot](https://github.com/ndianabasi/google-contacts/blob/21-add-profile-picture-for-contacts/api/app/Models/Contact.ts) of the file. Copy-and-paste the content of the snapshot into the `api/app/Models/Contact.ts` file.
At Line 4, we import the `attachment` decorator and `AttachmentContract` interface from `'@ioc:Adonis/Addons/AttachmentLite'` package.
From Line 63 to 69, we define the `profilePicture` property. However, instead of decorating it with the regular `column` decorator, we decorate the property with the `attachment` decorator. This notifies the `attachment-lite` addon that the column should be treated as an attachment column. The `attachment-lite` addon will then management the entire lifecycle (creation, update, retrieval, and deletion) of the `profilePicture` property of the `Contact` model.
```diff
+ @attachment({
+ disk: 'local',
+ folder: 'avatars',
+ preComputeUrl: true,
+ serializeAs: 'profilePicture',
+ })
+ public profilePicture?: AttachmentContract | null
```
We provide an option object containing `disk`, `folder`, `preComputeUrl`, and `serializeAs` properties.
* The `disk` property specifies where the images will be stored. We choose `local` because we want the images to be saved to the local disk of the API server. If you have the [AdonisJS Drive](https://docs.adonisjs.com/guides/drive) module installed, you could choose to use `s3` or `gcs` as storage disk.
* When using the `local` disk option, the `folder` property specifies where in the `tmp/uploads` directory the images will be stored. We specify `avatars` so the uploaded images will be saved to `tmp/uploads/avatars` directory.
* The `preComputeUrl` option specifies if the `attachment-lite` module should autogenerate URLs of the `profilePicture` images when a contact is fetched individually or listed (like during a pagination). This option is very importance as it simplifies fetching of the image URLs from the database.
* The `serializeAs` option is used to tell AdonisJS how to serialise the column. This has been discussed in great details in a [previous lesson](https://tech.ndianabasi.com/connecting-the-frontend-to-the-api-server-or-full-stack-google-contacts-clone-with-adonisjs-framework-nodejs-and-quasar-framework-vuejs#preparing-the-api-server) .
## Improving the `ContactValidator` File
Here we will improve the `ContactValidator` file so that the uploaded file is adequately validated.
Open the `api/app/Validators/ContactValidator.ts` file. Refer to [this snapshot](https://github.com/ndianabasi/google-contacts/blob/21-add-profile-picture-for-contacts/api/app/Validators/ContactValidator.ts) of the file. Copy-and-paste the content of the snapshot into the `api/app/Validators/ContactValidator.ts` file.
At Lines 16 and 25, we remove the `escape` option from the `email` fields. Since we are enforcing email validation, there is no need to escape the email strings.
At Line 28, we increase the value of `maxLength` rule to `25`.
From Line 48 to 51, we add the `profilePicture` property to validate the uploaded file. The `size` of the file is limted to a maximum of 500kb while the acceptable file types are: `jpg`, `png`, `webp`, and `gif`.
At Lines 69, 71, and 72, we add validation messages for the `profilePicture` and `birthday` properties.
## Improving the `ContactsController` File
Here, we will improve the `store` and `update` methods of the `ContactsController` class so that the `profilePicture` can be saved and updated.
Open the `api/app/Controllers/Http/ContactsController.ts` file. Refer to [this snapshot](https://github.com/ndianabasi/google-contacts/blob/21-add-profile-picture-for-contacts/api/app/Controllers/Http/ContactsController.ts) of the file. Copy-and-paste the content of the snapshot into the `api/app/Controllers/Http/ContactsController.ts` file.
At Line 5, we import the `Attachment` class from the `@ioc:Adonis/Addons/AttachmentLite`package.
At Line 13, we add `profile_picture` to the list of columns to be selected in the `index` method.
At Line 71, within the `store` method we destructure `profilePicture` from the validated payload. Same is done at Line 148 within the `updated` method.
At Line 92, we add `profilePicture` to the object parameter for the `Contact.create` static method. If `profilePicture` exists, the `profilePicture` property is assigned the result of the `Attachment.fromFile()` static method.
```diff
const contact = await Contact.create({
firstName,
...
website,
notes,
+ profilePicture: profilePicture ? Attachment.fromFile(profilePicture) : null,
})
```
Same thing is done at Line 169 within the `update` method.
Let's return to the frontend.
## Improve the Frontend Types
Open the `ui/src/types/index.ts` file. Refer to [this snapshot](https://github.com/ndianabasi/google-contacts/blob/21-add-profile-picture-for-contacts/ui/src/types/index.ts) of the file. Copy-and-paste the content of the snapshot into the `ui/src/types/index.ts` file.
From Lines 7 to 15, we improve the `FormItem` interface. We add `File` to the options for the `value` property so that File input can be accepted. We also add `file` to the options for the `inputType` property so that we can use the `QFile` component.
```diff
- value: string | number | null | undefined;
- inputType?: "text" | "number" | "date" | "email" | "url" | "textarea";
+ value: string | number | File | null | undefined;
+ inputType?:
+ | "text"
+ | "number"
+ | "date"
+ | "email"
+ | "url"
+ | "textarea"
+ | "file";
```
From Lines 62 to 87, we add the `EditedContactInterface` to hold the structure of the JSON returned from the `ContactsController.show` method.
```ts
export interface EditedContactInterface {
id: string;
firstName: string;
surname: string;
company?: string | null | undefined;
jobTitle?: string | null | undefined;
email1: string;
email2?: string | null | undefined;
phoneNumber1: string;
phoneNumber2?: string | null | undefined;
country?: string | null | undefined;
streetAddressLine1?: string | null | undefined;
streetAddressLine2?: string | null | undefined;
city?: string | null | undefined;
state?: string | null | undefined;
birthday?: string | null | undefined;
website?: string | null | undefined;
notes?: string | null | undefined;
profilePicture?: {
extname: string;
mimeType: string;
name: string;
url: string;
};
}
```
## Improve the Store Index File
Open the `ui/src/store/contacts/index.ts` file. Refer to [this snapshot](https://github.com/ndianabasi/google-contacts/blob/21-add-profile-picture-for-contacts/ui/src/store/contacts/index.ts) of the file. Copy-and-paste the content of the snapshot into the `ui/src/store/contacts/index.ts` file.
In this file, we will only rename all occurrences of `exampleModule` to `contactsModule`
## Adding File Upload Functionality to the `CreateContact` Component
Here, we will improve the `CreateContact.vue` component so that it provides a field for selecting the file which will be uploaded when a contact is being created or edited. We will also update the functionality of the component so that the selected file is packed together with the rest of the fields and dispatched for upload to the API server.
Open the `ui/src/pages/contacts/CreateContact.vue` file. Refer to [this snapshot](https://github.com/ndianabasi/google-contacts/blob/21-add-profile-picture-for-contacts/ui/src/pages/contacts/CreateContact.vue) of the file. Copy-and-paste the content of the snapshot into the `ui/src/pages/contacts/CreateContact.vue` file.
Let's discuss the new functionalities.
Before, we used the `v-for` directive on the `QInput` component to iterate over the `form` reactive object and render a `QInput` component for each entry in the `form` object. Now, we want to introduce the `QFile` component to handle file selection for the avatar. Hence, instead of using `v-for` directly on the `QInput` component, we will wrap the `QInput` component with a `template` wrapper (see Line 5) and also introduce the `QFile` component inside the `template` wrapper (see Line 41). The `QInput` component will only render when `form[key].inputType` is strictly not equal to `file`. Else, the `QFile` component will be rendered.
```html
```
The `QFile` component accepts two additional `props`: `accept` and `maxFileSize`; and emits a `rejected` event which we listen to and handle with the `onRejectProfilePicture` function. The `accept` prop takes a string of comma-separated file extensions. While the `maxFileSize` prop accepts the maximum allowable file size in bytes.
Within the `QFile` component we consume two slots: `before` and `after`. The `before` slot is used to render the `QIcon` component which shows the attachment icon on the left side of the `QFile` component. While the `after` slot is used to render the `QIcon` component with a `click` event listener for cancelling (nulling) the selected file. You may have noticed that the `after` slot will only be rendered if a file is selected. It makes sense this way.
In the `setup` hook, at Line 127, we define the `maxFileSize` constant and set the value to `500 * 1024` bytes which equals `500kb`.
From Line 130 to 136, we add the `profilePicture` property to the `form` reactive object so that the `QFile` component will render on top of the form.
```diff
const form: FormInterface = reactive({
+ profilePicture: {
+ label: "Profile Picture",
+ required: false,
+ value: null,
+ icon: "attach_file",
+ inputType: "file",
+ },
firstName: {
label: "First Name",
required: true,
....
}
})
```
At Line 327, we avoid initialising the `profilePicture` value in the `form` object when the form is being populated in `edit mode`.
```diff
- if (["id", "createdAt", "updatedAt"].includes(key) === false) {
+ if (
+ ["id", "createdAt", "updatedAt", "profilePicture"].includes(
+ key
+ ) === false
+ ) {
form[key].value = currentContact.value[key];
}
});
```
From Line 341 to 379, we modify the `submitPayload` computed ref to create and return a `FormData` object. As discussed earlier, we have to use a `FormData` to upload the file and other form fields. Line 342, creates an instance of the `FormData` class. In the rest of the lines, we append the values of the form fields to corresponding keys in the `formData` object. We also ensure that an empty string is returned if any of the value is `falsy`. At Line 374, we append the file to the key `profilePicture`. The `FormData` will be used during creation or edit of a contact.
> Note that you do not need to do any extra work in the Validation so that the FormData can be parsed. The `BodyParser` module inbuilt in AdonisJS handles all that magically.
```diff
- const submitPayload = computed(() => ({
- birthday: form.birthday.value,
- city: form.city.value,
- company: form.company.value,
- country: form.country.value,
- email1: form.email1.value,
- email2: form.email2.value,
- firstName: form.firstName.value,
- jobTitle: form.jobTitle.value,
- notes: form.notes.value,
- phoneNumber1: form.phoneNumber1.value,
- phoneNumber2: form.phoneNumber2.value,
- postCode: form.postCode.value,
- state: form.state.value,
- streetAddressLine1: form.streetAddressLine1.value,
- streetAddressLine2: form.streetAddressLine2.value,
- surname: form.surname.value,
- website: form.website.value,
- }));
+ const submitPayload = computed(() => {
+ const formData = new FormData();
+ formData.append("birthday", (form.birthday.value as string) ?? "");
+ formData.append("city", (form.city.value as string) ?? "");
+ formData.append("company", (form.company.value as string) ?? "");
+ formData.append("country", (form.country.value as string) ?? "");
+ formData.append("email1", (form.email1.value as string) ?? "");
+ formData.append("email2", (form.email2.value as string) ?? "");
+ formData.append("firstName", (form.firstName.value as string) ?? "");
+ formData.append("jobTitle", (form.jobTitle.value as string) ?? "");
+ formData.append("notes", (form.notes.value as string) ?? "");
+ formData.append(
+ "phoneNumber1",
+ (form.phoneNumber1.value as string) ?? ""
+ );
+ formData.append(
+ "phoneNumber2",
+ (form.phoneNumber2.value as string) ?? ""
+ );
+ formData.append("postCode", (form.postCode.value as string) ?? "");
+ formData.append("state", (form.state.value as string) ?? "");
+ formData.append(
+ "streetAddressLine1",
+ (form.streetAddressLine1.value as string) ?? ""
+ );
+ formData.append(
+ "streetAddressLine2",
+ (form.streetAddressLine2.value as string) ?? ""
+ );
+ formData.append("surname", (form.surname.value as string) ?? "");
+ formData.append("website", (form.website.value as string) ?? "");
+ formData.append(
+ "profilePicture",
+ (form.profilePicture.value as File) ?? ""
+ );
+ return formData;
+ });
```
At Line 414, we create the `onRejectProfilePicture` for handling the `@rejected` event on the `QFile` component. The function collects error messages and uses the `Quasar Notify` plugin to alert the user when the selected file is uploaded.
```ts
const onRejectProfilePicture = function (
validationError: Array<{
failedPropValidation: "accept" | "max-file-size";
file: File;
}>
) {
const messages: string[] = [];
if (validationError && validationError.length) {
validationError.forEach((error) => {
if (error.failedPropValidation === "max-file-size")
messages.push("Maximum file size is: 500 kb");
if (error.failedPropValidation === "accept")
messages.push("The provided file type is now allowed.");
});
if (messages && messages.length) {
messages.forEach((message) => {
$q.notify({
message,
type: "negative",
});
});
}
}
};
```
Lastly for the `CreateContact` component, at Lines 449 and 450, we return the `onRejectProfilePicture` and `maxFileSize` to the template section.
## Improving the `CREATE_CONTACT` Action of the `contacts` Module
We need to improve the `CREATE_CONTACT` action to allow us successfully upload a the `FormData` being sent from the `CreateContact.vue` component during edit or creation mode.
Open the `ui/src/store/contacts/actions.ts` file. Refer to [this snapshot](https://github.com/ndianabasi/google-contacts/blob/21-add-profile-picture-for-contacts/ui/src/store/contacts/actions.ts) of the file. Copy-and-paste the content of the snapshot into the `ui/src/store/contacts/actions.ts` file.
At Line 58, we update the type of the payload to `FormData`
At Line 66 to 68, we add the header `Content-Type` to the `headers` property of the `POST` request config.
```diff
await api
- .post("/contacts", payload)
+ .post("/contacts", payload, {
+ headers: {
+ "Content-Type": "multipart/form-data",
+ },
+ })
.then((response: HttpResponse) => {
const newContactId = response.data.data as Contact["id"];
return resolve(newContactId);
})
.catch((error) => reject(error));
```
We repeat same for the `PUT` request.
```diff
await api
- .put(`/contacts/${contactId}`, payload)
+ .put(`/contacts/${contactId}`, payload, {
+ headers: {
+ "Content-Type": "multipart/form-data",
+ },
+ })
.then((response: HttpResponse) => {
const editContactId = response.data.data as Contact["id"];
return resolve(editContactId);
})
.catch((error) => reject(error));
```
By setting the `Content-Type` header to `multipart/form-data`, we are informing the API server to read the data uploaded as a `multipart/form-data` not a JSON object. This must be done because by default, the `Content-Type` is set or assumed to be `application/json`.
Now save all files and serve both the fronend and API server.
```bash
# Serve the frontend
cd ui
yarn serve
# Split the terminal and serve the backend
cd api
yarn serve
```
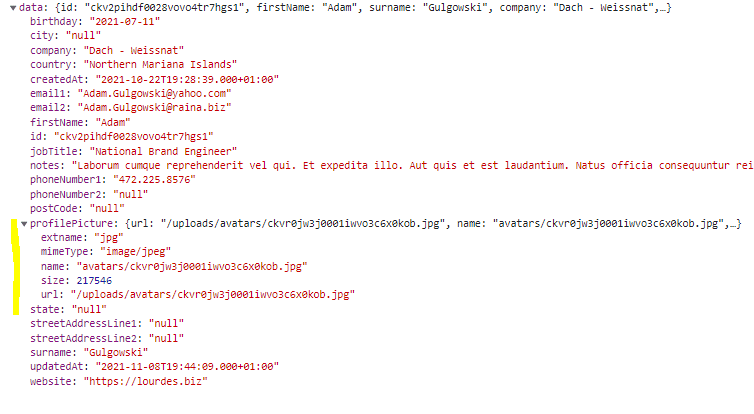
Visit the `Contact Creation` page, select a file, fill and submit the form, the new contact should be created, and you will be redirected to the `View Contact` page. You can inspect the Network tab of devtools to see the `profilePicture` property of the `contact` data sent from the API server. The `profilePicture` property will look like this:
```json
{
"url": "/uploads/avatars/ckvr0jw3j0001iwvo3c6x0kob.jpg",
"name": "avatars/ckvr0jw3j0001iwvo3c6x0kob.jpg",
"extname": "jpg",
"size": 217546,
"mimeType": "image/jpeg"
}
```
If everything went well, congratulations!! You have successfully uploaded an avatar and associated it with the `profilePicture` property of the `Contact` model.
Amidst this success, we still cannot see the profile picture in our `View Contact` page. Let's fix this.
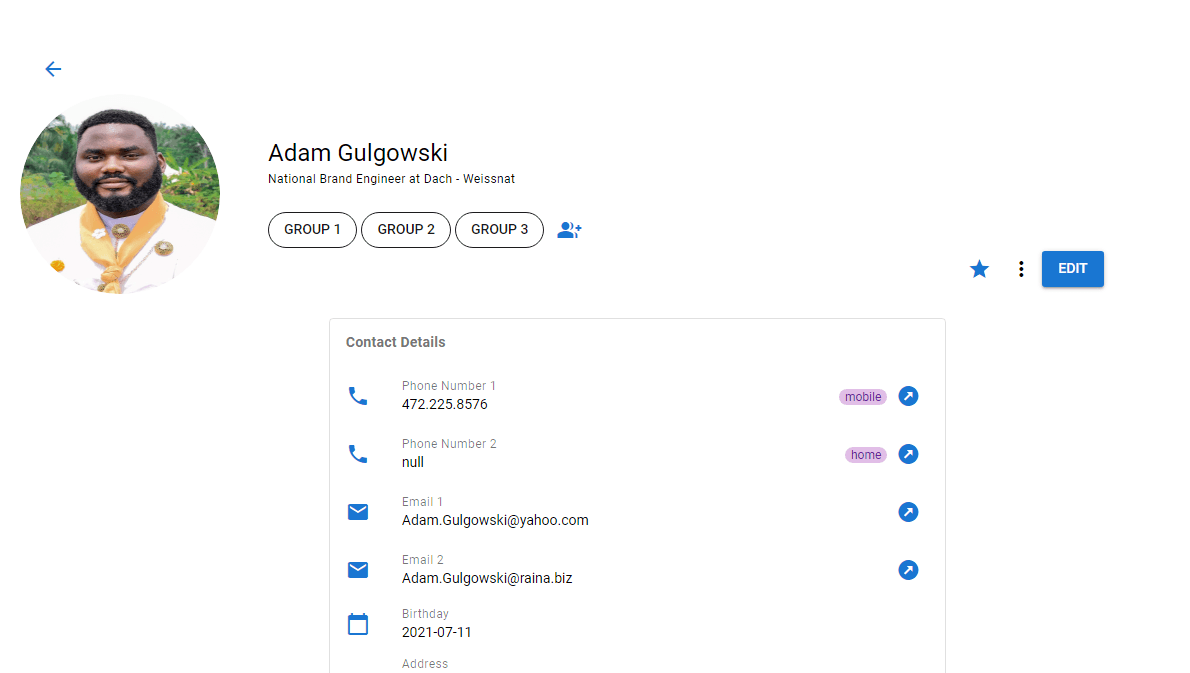
## Displaying the Avatar (Profile Picture) in the `View Contact` Page
In this section, we will edit the `ViewContact` component so that the uploaded avatar is displayed instead of the placeholder image.
Open the `ui/src/pages/contacts/ViewContact.vue` file. Refer to [this snapshot](https://github.com/ndianabasi/google-contacts/blob/21-add-profile-picture-for-contacts/ui/src/pages/contacts/ViewContact.vue) of the file. Copy-and-paste the content of the snapshot into the `ui/src/pages/contacts/ViewContact.vue` file.
Let's start from the `script` section.
At Line 230, we import the `EditContactInterface` from the `types/index.ts` file.
```diff
+ import { EditedContactInterface } from "../../types";
```
At Line 246, we change the type casting within the `currentContact` computed ref from `Contact` to `EditedContactInterface`.
At Line 264, we introduce the `profilePicture` computed ref which computed the URL of the avatar using the value of `store.getters.getRootURL`.
```ts
const profilePicture = computed(() => {
const rootURL = computed(() => store.getters.getRootURL);
return currentContact.value?.profilePicture
? `${rootURL.value}${currentContact.value.profilePicture.url}`
: "";
});
```
In the `template` section, we update the `QAvatar` component.
```diff

![]() ```
Now save the file and refresh the `Contact View` page, you will see the uploaded avatar instead of the placeholder image. As shown below:
Still, on the homepage, the placeholder avatars are still displayed on the contacts table. Let's fix this.
## Display Uploaded Avatars on the Contacts Table
Open the `ui/src/pages/Index.vue` file. Refer to [this snapshot](https://github.com/ndianabasi/google-contacts/blob/21-add-profile-picture-for-contacts/ui/src/pages/Index.vue) of the file. Copy-and-paste the content of the snapshot into the `ui/src/pages/Index.vue` file.
Beginning from the `script` section.
At Line 143, we import the `EditedContactInterface`
```diff
- import { Contact, PaginatedData, VirtualScrollCtx } from "../types";
+ import {
+ Contact,
+ EditedContactInterface,
+ PaginatedData,
+ VirtualScrollCtx,
+ } from "../types";
```
At Line 162, we create the `rootURL` computed ref.
```diff
+ const rootURL = computed(() => store.getters.getRootURL);
```
At Line 265, we return the `formatProfilePicture` function. This function is called in the `template` section and used to dynamically generate the avatars.
```diff
return {
selected,
...
isTouchEnabled,
handleAvatarClick,
+ formatProfilePicture: (
+ profilePicture: EditedContactInterface["profilePicture"]
+ ): string =>
+ profilePicture ? `${rootURL.value}${profilePicture.url}` : "",
};
```
In the `template` section, at Line 73, we update the `QAvatar` component to display the avatar.
```diff
```
At Line 75, the `formatProfilePicture` function is called to obtain the avatar URL: `formatProfilePicture(props.row.profilePicture)`. The `Props` object is exposed by the `body` slot at Line 52. It contains several objects including `row` which contains the data to be rendered for the current row per column. The `profilePicture` object contains the avatar metadata including the URL of the avatar.
Now, click on `Contacts` on the sidebar. Edit the first contact on the table. Upload an image and updated the contact. Go back to the `Contacts` table and refresh the window. The new avatar will be displayed now.
If you have gotten to this stage and everything is working well, congratulations!!
That is the end of the lesson. Save all files and commit the changes.
```bash
git add .
git commit -m "feat: implement contact avatars at the frontend and backend"
git push origin 20-add-avatars-to-contacts
git checkout master
git merge master 20-add-avatars-to-contacts
git push origin master
```
*This document was generated from the live article page on https://ndianabasi.com/technical-blog/article/hg9ilaubqesm8angg0rhrjp9/uploading-files-and-creating-avatars-for-contacts-with-adonis-js-and-axios • 2026-06-07*
```
Now save the file and refresh the `Contact View` page, you will see the uploaded avatar instead of the placeholder image. As shown below:

Still, on the homepage, the placeholder avatars are still displayed on the contacts table. Let's fix this.
## Display Uploaded Avatars on the Contacts Table
Open the `ui/src/pages/Index.vue` file. Refer to [this snapshot](https://github.com/ndianabasi/google-contacts/blob/21-add-profile-picture-for-contacts/ui/src/pages/Index.vue) of the file. Copy-and-paste the content of the snapshot into the `ui/src/pages/Index.vue` file.
Beginning from the `script` section.
At Line 143, we import the `EditedContactInterface`
```diff
- import { Contact, PaginatedData, VirtualScrollCtx } from "../types";
+ import {
+ Contact,
+ EditedContactInterface,
+ PaginatedData,
+ VirtualScrollCtx,
+ } from "../types";
```
At Line 162, we create the `rootURL` computed ref.
```diff
+ const rootURL = computed(() => store.getters.getRootURL);
```
At Line 265, we return the `formatProfilePicture` function. This function is called in the `template` section and used to dynamically generate the avatars.
```diff
return {
selected,
...
isTouchEnabled,
handleAvatarClick,
+ formatProfilePicture: (
+ profilePicture: EditedContactInterface["profilePicture"]
+ ): string =>
+ profilePicture ? `${rootURL.value}${profilePicture.url}` : "",
};
```
In the `template` section, at Line 73, we update the `QAvatar` component to display the avatar.
```diff
```
At Line 75, the `formatProfilePicture` function is called to obtain the avatar URL: `formatProfilePicture(props.row.profilePicture)`. The `Props` object is exposed by the `body` slot at Line 52. It contains several objects including `row` which contains the data to be rendered for the current row per column. The `profilePicture` object contains the avatar metadata including the URL of the avatar.
Now, click on `Contacts` on the sidebar. Edit the first contact on the table. Upload an image and updated the contact. Go back to the `Contacts` table and refresh the window. The new avatar will be displayed now.

If you have gotten to this stage and everything is working well, congratulations!!
That is the end of the lesson. Save all files and commit the changes.
```bash
git add .
git commit -m "feat: implement contact avatars at the frontend and backend"
git push origin 20-add-avatars-to-contacts
git checkout master
git merge master 20-add-avatars-to-contacts
git push origin master
```
*This document was generated from the live article page on https://ndianabasi.com/technical-blog/article/hg9ilaubqesm8angg0rhrjp9/uploading-files-and-creating-avatars-for-contacts-with-adonis-js-and-axios • 2026-06-07*